How to Prompt
Adding References
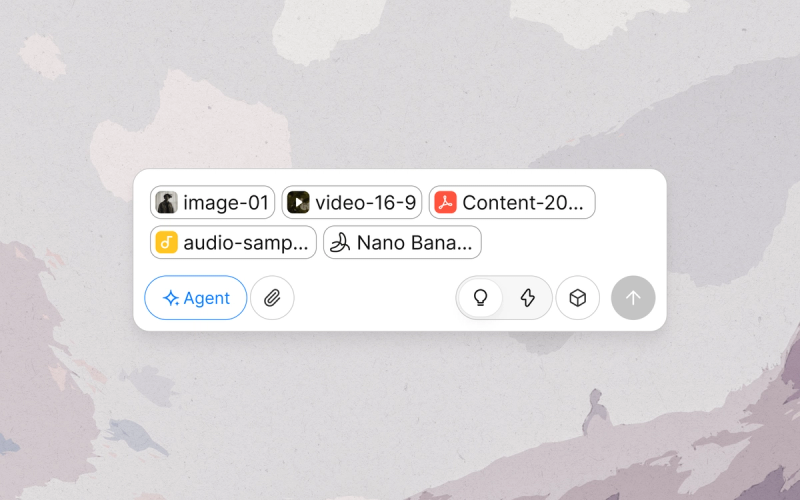
Upload Files
Import multimodal files into the Agent conversation as references.
What It Does
Import images, videos, and PDFs into a Lovart conversation to use as references for your task. Upload Files feeds assets into the Agent's conversational context. To place assets directly onto the Canvas for visual manipulation, use Add to Canvas instead.
How to Use
Method 1: Click the Upload Button
- Click More (the + button) on the bottom-left corner of the input box.
- Click Upload Files.
- Choose files from your device.
Method 2: Drag and Drop
- Drag files directly into the input box and release.
Supported Formats
- Images: JPG, PNG
- Videos: MP4, MOV
Quick Tips
- Use high-resolution source files for the best results.
Limitations
- Maximum of 10 uploaded items per conversation input.
Related Features
- Add to Canvas: Upload assets directly onto the infinite Canvas.
- Mention: Specify uploaded files as references in a specific prompt for the Agent with
@.
Assets Library
Upload and manage reusable character, audio, and video assets to reference across projects.
What It Does
The Assets Library stores character, audio, and video assets so you can reuse them across generations and projects.
How to Use
- Open the Assets Library.
- In a new project, click the Assets Library icon in the input box.
- Pick or upload assets.
- Browse Lovart's preloaded characters, audio, and video, or upload your own files to build a personal library. Uploaded assets stay available across future projects.
- Mention an asset in your prompt.
- Select an asset to attach it to the current prompt. It appears as a Mention (@) in the input box and passes to the Agent as a reference for that generation.
Quick Tips
- Combine an Assets Library mention with a Brand Kit to keep both the subject and the visual identity consistent in one generation.
Related Features
- Upload Files: Attach references to a one-off conversation instead of saving them for reuse.
- Brand Kit: Store brand-specific identity (logos, colors, fonts) rather than character, audio, or video assets.
- Mention: Pull a reference into a prompt with
@.
Brand Kit
Save your logos, colors, fonts, and design rules as Brand Kits so every output stays on-brand.
What It Does
A Brand Kit is a set of a brand's visual identity, stored globally, that the Agent can follow when performing design tasks. Configure a kit once, then reuse it across tasks, sessions, and projects to generate on-brand assets. You can create a separate Brand Kit for each brand you work on.
How to Use
- Create a Brand Kit.
- From the Lovart homepage, click the Brand Kit icon in the left toolbar to open the Brand Kit manager.
- Manual upload: upload logos, fonts, color swatches, design guidance, photography, and brand guidelines.
- Parse brand book: upload your existing brand book and have Lovart extract elements automatically.
- Edit a Brand Kit.
- From the Lovart homepage, click the Brand Kit icon in the left toolbar to open the Brand Kit manager.
- Click to open a kit and add, replace, or remove assets at any time. Changes take effect on subsequent generations.
- Apply a Brand Kit.
- Apply to one generation: Type @ in the input box and select a Brand Kit from the dropdown. The kit attaches only to that generation.
- Apply to a project: Use the Brand Kit selector in the upper-left corner of the Canvas. Every generation in the project references the kit automatically.
Quick Tips
- A Brand Kit is more than just assets. Design rules and guidance live here too. Use them to enforce layout conventions and voice.
- Create separate Brand Kits for different clients or sub-brands. One account can serve multiple identities without cross-contamination.
Brand Kit Quota
- Brand Kit quota per account depends on your plan:
- Free: 1
- Starter: 5
- Basic: 10
- Pro: 30
- Ultimate / Ultimate Teams: 100
Related Features
- Upload Files: Attach reference files to a single conversation.
- Mention: Reference a specific Brand Kit, model, or asset via @ for one generation.
- Assets Library: Broader, non-brand-specific asset store.