How to Transform AI-Generated Posters into Professional Print-Ready Designs 2025

So you've created some amazing AI-generated posters in Lovart, but now you're wondering how to transform them into professional prints that would look stunning on a wall or at your next event? You're in the right place! 👋
The gap between a digital design and a print-ready masterpiece can sometimes feel like crossing an ocean on a raft, but don't worry—I'm here to be your guide. In this comprehensive walkthrough, I'll show you exactly how to post-process AI posters created with Lovart and prepare them for professional printing with results that will make your jaw drop.
Whether you're a seasoned designer looking to speed up your workflow or a complete beginner excited about the possibilities of AI design, this guide will take you from "that looks cool on my screen" to "wow, this print is gallery-worthy!"
Why Post-Processing Your AI Posters Matters
Before we dive into the how, let's talk about the why. AI tools like Lovart are revolutionary for generating creative concepts, but there's a reason why professional designers still have jobs in 2025! The journey from AI generation to professional poster output requires some human touch.
AI-generated images often need refinement to meet print standards. Learning how to post-process AI posters properly can make the difference between an amateur-looking print and a professional piece that commands attention. Here's why it matters:
- Color accuracy: What looks vibrant on screen might print differently due to the RGB vs. CMYK color space difference
- Resolution requirements: Print demands higher resolution than digital displays
- Bleed and margin considerations: Professional printing requires specific setup to avoid white edges
- Fine detail control: AI sometimes creates details that won't translate well to print
- Consistency: Ensuring your brand identity remains intact across all printed materials

Now that we understand why post-processing matters, let's look at the complete AI poster workflow from generation to print guide!
Understanding Lovart's Capabilities for Poster Design
Lovart stands out as an AI design agent rather than just another image generator. This distinction is crucial when creating print materials. Unlike basic AI art tools, Lovart was built with professional design workflows in mind.
Here's what makes it particularly suitable for poster design:
- Multiple format support: From social media posts to large-format posters, Lovart can generate designs in various dimensions
- The ChatCanvas feature: This allows you to have a back-and-forth conversation about your design, making refinements much more intuitive
- Style consistency: Lovart can maintain a consistent style across multiple designs—essential for campaign materials
- Export options: The platform offers various export formats suitable for different printing needs
While these features give you a strong starting point, knowing how to post-process AI posters will elevate your designs to truly professional quality. Let's explore the complete process from idea to printed masterpiece.
Step-by-step Guide for How to Post-process AI Posters
Step 1: Planning Your Poster Design in Lovart
The best print results start with proper planning. Before you even generate your first design, consider these factors that will impact how you'll need to post-process AI posters later:
Define Your Print Specifications
Start by determining the final print specifications. This will guide your generation and post-processing decisions:
| Print Specification | Why It Matters | Typical Values |
|---|---|---|
| Poster dimensions | Determines aspect ratio and resolution needs | 24"×36", 18"×24", A1, A2 |
| Print method | Different methods have different color requirements | Digital, offset, large format |
| Paper type | Affects color absorption and appearance | Glossy, matte, canvas, recycled |
| Intended viewing distance | Influences detail requirements | Close-up, medium, far distance |
When prompting Lovart, include these specifications. For example:
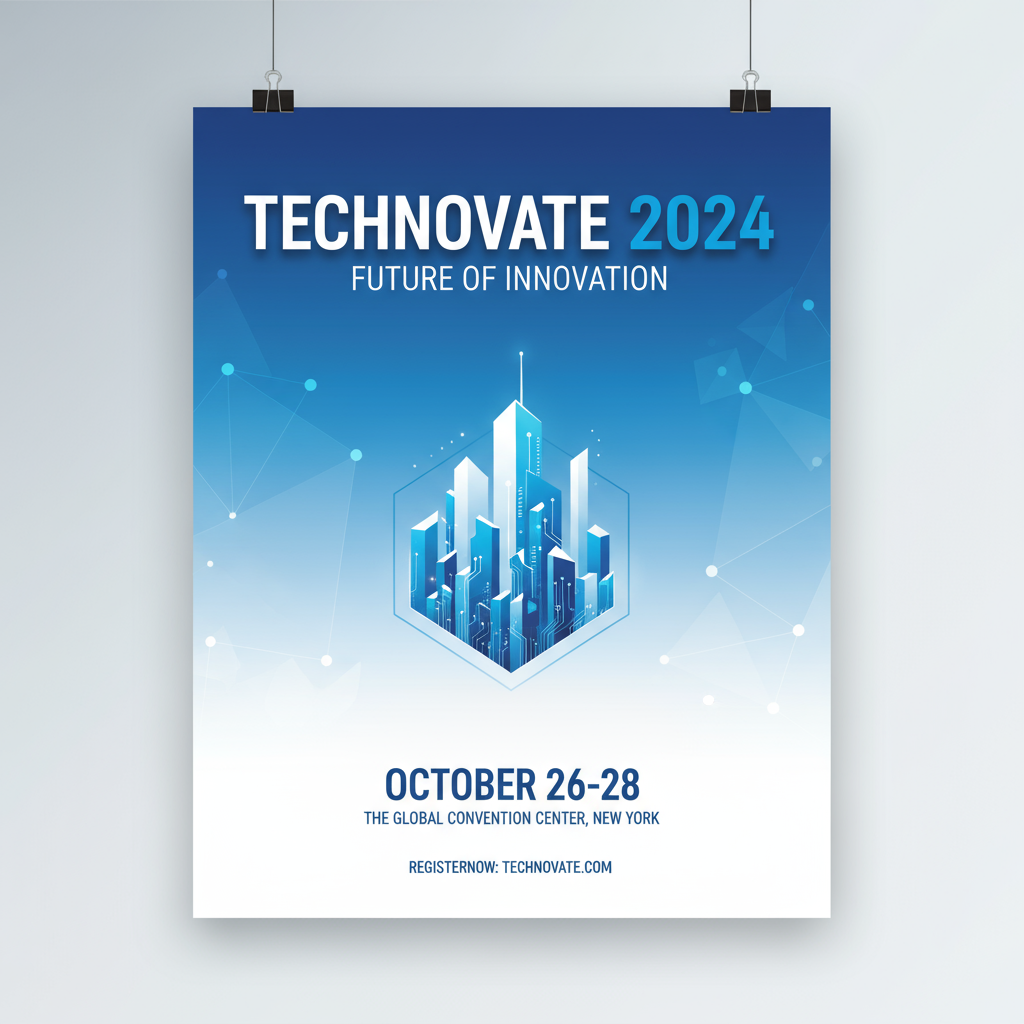
"Create a minimalist event poster for a jazz festival, portrait orientation, suitable for 18"×24" print on matte paper. Include space for text at the bottom for event details."

Crafting Effective Prompts for Print-Ready Designs
The way you prompt Lovart significantly impacts how much post-processing work you'll need to do later. Here are some tips specifically for print-oriented prompts:
- Specify high resolution: Always request the highest resolution possible
- Mention print intent: Include phrases like "print-ready" or "for large-format printing"
- Request clean elements: Ask for "clear text," "distinct elements," or "high contrast" for better print results
- Define color palette: Specify colors that will translate well to print (avoid overly saturated or neon colors)
Here's an example of a well-crafted prompt for a print-ready poster:
"Design a high-resolution print-ready poster for a technology conference. Use a blue and white color scheme with clean typography and distinct visual elements. Include ample negative space for readability when printed at 24"×36". Optimize for CMYK color space."
Step 2: Generating Your Initial Design in Lovart
Now that you've planned your approach, it's time to generate your initial design. This is where the AI poster optimization tutorial begins in earnest. Let's walk through the process:
Basic Generation Steps
- Open Lovart and access the design canvas
- Enter your detailed prompt based on the planning steps above
- Select appropriate dimensions that match your final print size
- Generate several variations to find the best starting point
- Choose the most promising design for further refinement
Evaluating Your Generated Designs for Print Potential
Not all AI-generated designs will be suitable for high-quality printing. Here's a checklist to evaluate your generations:
- Does the design have sufficient resolution for your print size?
- Are the colors vibrant but not oversaturated?
- Is there adequate contrast that will translate well to print?
- Are text elements readable and properly spaced?
- Are important elements kept away from edges (considering bleed areas)?
- Does the overall composition work at the intended viewing distance?
If your design doesn't meet these criteria, you have two options: regenerate with a refined prompt or move forward knowing you'll need more extensive post-processing.

Using Lovart's ChatCanvas for Iterative Refinement
One of Lovart's standout features is the ChatCanvas, which allows for conversational design refinement. This is incredibly useful for creating print-ready designs:
- Provide specific feedback: "Make the headline larger and increase contrast for better printing"
- Request targeted adjustments: "Shift the color palette slightly to ensure it works in CMYK space"
- Ask for variations: "Show me three versions with different text placement options"
Continue this iterative process until you have a strong foundation for your poster. Remember, the goal isn't perfection at this stage—it's creating a solid base for post-processing.
Step 3: Essential Post-Processing Techniques for Print-Ready AI Posters
Now we're getting to the heart of how to post-process AI posters for professional results. While Lovart gives you an excellent start, these techniques will transform your design into a true print-ready masterpiece:
Color Correction and Color Space Conversion
The most critical step in how to make print-ready AI design is proper color management:
- Export your design from Lovart at the highest available quality
- Open in a professional editing software like Adobe Photoshop, Affinity Photo, or GIMP
- Convert from RGB to CMYK color space (Edit > Convert to Profile > CMYK)
- Adjust colors as needed after conversion, as some vibrancy may be lost
- Consider using a color calibrated monitor for accurate preview
💡 Pro Tip: If you're sending your poster to a professional print shop, ask them for their specific color profile. This will give you the most accurate results for their particular printers.
Resolution Enhancement and Detail Preservation
For professional printing, resolution is paramount. Here's how to ensure your Lovart design meets print standards:
- Check your current resolution (in Photoshop: Image > Image Size)
- For high-quality printing, aim for 300 DPI at final print dimensions
- If upscaling is needed, use AI-powered tools like Topaz Gigapixel AI or Photoshop's Super Resolution feature
- After upscaling, apply selective sharpening to maintain crisp details
- Pay special attention to text, which often needs manual refinement after AI generation
Setting Up Proper Bleed and Margins
Understanding how to post-process AI posters for printing requires knowledge of bleeds and margins:
| Element | Typical Measurement | Purpose |
|---|---|---|
| Bleed | 0.125" to 0.25" beyond trim edge | Ensures color runs to edge after cutting |
| Safety margin | At least 0.25" inside trim edge | Keeps important elements from being cut |
| Trim marks | Outside the artwork area | Guides for cutting the final print |
To properly set up your Lovart design:
- Extend background elements to fill the bleed area
- Keep critical elements (especially text) within safety margins
- Add trim marks if your printing service requires them
- Save a copy with visible guides for your reference
Fine-Tuning Typography and Text Elements
AI often struggles with perfect typography, so this is an area where your human touch is essential:
- Check all text for accuracy and readability
- Ensure consistent spacing between letters, words, and lines
- Align text elements properly using grids
- Consider replacing AI-generated text with actual font rendering for maximum crispness
- Verify font licenses if using specific typefaces for commercial printing
"Typography is what makes or breaks a poster. Even the most beautiful AI-generated design can be ruined by poor text handling. Take your time with this step!"

Step 4: Advanced AI Poster Refinement Steps for Professional Results
For those looking to take their print preparations to the next level, these advanced techniques will ensure truly professional results:
Layer Organization and Non-Destructive Editing
Professional designers know that organized files are essential for efficient work and future adjustments:
- Export separate elements from Lovart when possible
- Create a logical layer structure in your editing software
- Use adjustment layers instead of direct image modifications
- Group related elements for easier management
- Name all layers clearly for easy navigation
This organization not only makes your current post-processing easier but also allows for quick adjustments if your client or printer requests changes.
Custom Color Profiles and Printer-Specific Optimizations
For absolute color precision, consider these advanced color management techniques:
- Obtain ICC profiles from your printing service
- Install and use these profiles in your editing software
- Soft-proof your designs using the printer profile
- Adjust for specific paper types, as they affect color absorption
- Consider a test print on the actual material before a full print run
🖨️ Printing Fact: Different printing technologies render colors differently. Digital printers, offset presses, and large-format inkjet printers all have unique color characteristics that should be accounted for in your post-processing workflow.
Creating Print-Ready File Formats
The final step in how to post-process AI posters is preparing the right file format:
| File Format | Best Uses | Key Settings |
|---|---|---|
| PDF/X-1a | Standard commercial printing | Embedded fonts, CMYK, no transparency |
| TIFF | High-quality photo printing | Flattened, CMYK, LZW compression |
| EPS | Vector elements and logos | Outlined fonts, CMYK |
| PDF/X-3 | Modern digital printing | Supports transparency, color management |
For most poster printing from Lovart designs, a high-resolution PDF with the following specifications is recommended:
- Export as PDF/X-4:2010 if your printer supports it
- Embed all fonts
- Include bleed and crop marks
- Set image compression to minimum or none for highest quality
- Include relevant metadata for easier file management
Step 5: Quality Control and Preflight Checks Before Printing
The final stage in your AI to print workflow is thorough quality control. This prevents costly printing mistakes:
Essential Preflight Checklist
- Resolution check: Verify that all elements have sufficient resolution (300 DPI minimum)
- Color space verification: Confirm everything is in CMYK (no RGB elements remaining)
- Font embedding: Ensure all fonts are properly embedded or outlined
- Overprint settings: Check for unintended overprint settings that could cause issues
- Transparency flattening: Verify that transparency is properly handled for printing
- Bleed confirmation: Double-check that bleed extends sufficiently
- Spelling and content check: Last review of all text for accuracy
Using Professional Preflight Tools
For critical print jobs, consider using dedicated preflight tools:
- Adobe Acrobat Preflight: Comprehensive checking for PDF files
- Markzware FlightCheck: Standalone preflight solution for multiple file types
- Callas pdfToolbox: Advanced PDF verification and correction
Printer Communication and Proofing
Always maintain clear communication with your printer:
- Send specifications along with your files
- Request a digital proof before full production
- For critical jobs, consider a hard proof (actual printed sample)
- Discuss any special requirements (paper type, finishing options, etc.)
- Confirm delivery timeline and pickup/shipping arrangements
Common Challenges When Post-Processing AI Posters
Even with the best AI poster refinement steps, you'll likely encounter some challenges. Here's how to address them:
| Common Problem | Solution |
|---|---|
| Color Shifts After RGB to CMYK Conversion | Start with slightly more saturated colors in Lovart, knowing they'll be toned down.After conversion, use selective color adjustments to bring back vibrancy to key elements while keeping skin tones and neutral areas natural. |
| Loss of Detail in Dark or Light Areas | Use curves or levels adjustments to expand the tonal range. Consider adding subtle gradient maps to introduce more midtones in problem areas. For printing, ensure your shadows don't exceed 85% total ink coverage to maintain detail. |
| Text Appears Pixelated or Blurry | Whenever possible, recreate text elements using actual fonts rather than relying on the AI-generated text.If the text is part of the design, use selective sharpening on text areas or consider masking and replacing particularly problematic text. |
| Unexpected Crop After Printing | Always design with a safety margin of at least 0.25" (6mm) inside the trim edge. Use guides in your editing software to mark these boundaries and keep critical elements within them.Communicate clearly with your printer about trim expectations. |
Looking to the Future: AI Poster Design Trends and Technologies
As we explore how to post-process AI posters, it's worth looking at where the technology is headed:
Emerging AI Capabilities for Print Design
- Direct CMYK generation: Future AI models may generate directly in print color spaces
- Print-aware composition: AI learning to understand bleed and margin requirements
- Automated post-processing: Tools that handle common adjustments automatically
- Variable data integration: AI designs that accommodate personalized elements
- Material-aware rendering: AI that can preview how designs will look on different substrates
Sustainability Considerations in AI-to-Print Workflows
As designers, we have a responsibility to consider environmental impact:
- Optimize for ink usage: Adjust designs to reduce heavy ink coverage
- Consider recycled papers: Test how your post-processed designs appear on eco-friendly stocks
- Digital proofing: Minimize physical proofs to reduce waste
- Right-sizing: Print at appropriate dimensions to minimize paper waste
Conclusion: Mastering the Art of AI Poster Post-Processing
Learning how to post-process AI posters is both an art and a science. While Lovart gives you an incredible head start with its intelligent design capabilities, the human touch in post-processing is what transforms a good digital concept into a stunning printed reality.
By following the professional poster output guide outlined in this article, you're now equipped to bridge the gap between AI creativity and print-ready professionalism. Remember that each project is unique, and your post-processing approach should be tailored to the specific requirements of your design and printing method.
The future of design lies in this powerful partnership between AI generation and human refinement. As tools like Lovart continue to evolve, the possibilities for creating stunning print materials will only expand—but the fundamental principles of preparing designs for print will remain essential knowledge for any serious designer.
Now it's your turn to put these AI poster optimization tutorial steps into practice. Start with a simple project, work through the complete AI poster workflow from generation to print guide, and watch as your designs transform from screen to stunning physical reality!
🎨 Ready to create? Start by generating your next poster design in Lovart, then apply these post-processing techniques to achieve professional-quality prints that will impress clients and audiences alike!

Share Article